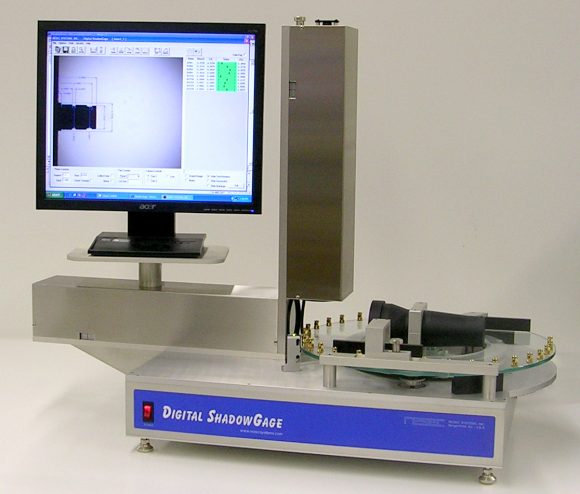
Whether for short or long production runs, 100% inspection is required for a wide range of parts to meet exacting Six Sigma standards
When contract machine shops create turned metal parts for the automotive, aerospace, medical and electronics industries, the parts must be increasingly precise to meet the specifications and tolerances required for today’s automated assembly processes. As a result, contract machine shops are increasingly implementing 100% inspection and sorting procedures to achieve near zero defects, commensurate with Six Sigma standards.
However, due to the nature of contract work there can be a wide variety of part types and sizes to inspect, in production runs large and small. The challenge is that traditional automated 100% inspection and sorting equipment is typically custom-built for specific parts, and not easily adaptable for others. Manually loaded inspection equipment is more flexible, but can be slow, expensive, and opens the door to human error.
Given the increasing demands, machine shops are seeking more flexible alternatives that can be used to run a variety of parts, while allowing for quick changeover as needed.
With this type of equipment, a variety of small turned, screw-machined, molded or stamped parts up to 4.5 inches long are placed on a rotating glass surface, either manually or using a vibratory bowl feeder.
The parts are then conveyed to the inspection area where digital cameras paired with a high-speed LED strobed lamp generate high quality, blur-free images of the moving parts. Software is then used to compare the part against the specifications in a sophisticated and precise gauging process, before they are sorted into “pass” and “fail” bins.
“Increasing sigma level quality is becoming a requirement and is a driving factor for 100% inspection in today’s machine shops,” says Stephen Kaspari, Vice President at Warren Screw Products Inc, a Warren, Michigan based manufacturer of close-tolerance turned, broach, machined and assembled metal components for industries such as automotive, appliance, commercial, heavy truck, agriculture and military.
“By switching to 100% inspection with more flexible equipment, we gain the ability to run parts manually for as few as 50 pieces, to automated inspection and sorting of more than a million parts at a time,” adds Kaspari. “Our sigma has increased to meet the tightest tolerances, which has helped us win bids as well.”
Flexible, Accurate 100% Inspection
According to Kaspari, Warren Screw Products was seeking a method to achieve flexible, high-speed inspection with accuracy up to 0.0001” and was not satisfied with traditional techniques.
“Because of variations in turning equipment and raw material, some product can be out of tolerance,” says Kaspari. “But with manual end of the line inspection, you may only reach an 80% level of effectiveness [approximately sigma level 2.5] and will not achieve the goal of ‘zero defects’ to meet automotive industry standards.” Not only that, he adds, but manually checking each part for thread presence or pitch diameter is extremely time-consuming and prone to human error.
Although Warren Screw Products was using a mechanical sorting system, achieving tighter tolerances was necessary to get as close to zero defects as possible.
To accomplish these goals, however, the equipment utilized for 100% inspection had to be flexible enough to inspect a wide variety of parts.
“In total, we run 600 active parts that are all uniquely designed for a customer-specific application, so we need the ability to rapidly and flexibly switch over to inspect other parts and part families,” says Kaspari, who notes that some of the parts are for a new Corvette transmission. “So, we needed the ability to quickly inspect turned parts, which could share 10 common features yet have a different diameter, neck length, or thread size.”
Kaspari turned to a 100% inspection system, called the ShadowGage Sorter from Resec Systems LLC, a Bergenfield, NJ based manufacturer of automated 100% inspection sorting systems for small turned parts.
The sorter utilizes a rotating glass platen to transport, align, measure, and sort the parts. Precision optics and a high-speed LED strobed lamp are used to obtain a gage quality image of the moving parts. The part’s dimensions are extracted from the image in a fraction of a second and displayed on a monitor directly over the image. The
monitor shows the actual measurements as well as the tolerances.
If all the dimensions are within specified tolerances, the part is ejected from the platen by a precisely timed air pulse, which places it into the PASS bin. The rejects remain on the platen and are mechanically forced into the FAIL bin. Each part’s measurements are stored in a file and can be retrieved by most Statistical Process Control (SPC) programs or Microsoft’s Excel®.
With the system, inspection of all external part dimensions is possible to an accuracy of ±0.0001 inches at a rate of up to 7,200 parts per hour, and the sorter can easily be configured to inspect different parts.
“Zero defects are required for the automotive market,” says Kaspari. “So, almost every part we run off our screw machines goes to end-of-line inspection equipment like a Resec Systems unit to inspect for out-of-tolerance pieces.”
Kaspari estimates that one machine can perform the inspection of 10 to 15 people doing the same work manually. As a result, the equipment had a quick ROI.
“With the sorters, we save tens of thousands of dollars annually in labor alone, so we were able to pay off the machines in less than six months,” says Kaspari.
The ShadowGage Sorter is offered in two configurations and Warren Screw Products has one of each operating six days a week, 20 hours a day. Flat platen sorters are for parts that have a “flat end” and are not too long, so they can stand on their head. Tilted platen sorters are used for longer parts or those without a flat head. The parts lie “tilted” on their sides on the platen and the unit adjusts the camera angle to provide accurate measurement. With either system, the measurements performed on each part can be saved as an inspection program for the part and be easily recalled at any time.
“We probably have 30 different parts that we run with O-rings on them, and we have to know the O-ring is correctly installed, in the correct location, with only one installed on each part,” says Kaspari. “For the parts with O-rings, we have had a very high level of success using the equipment to get to zero defects for our customers.”
The ShadowGage sorters can be loaded manually or by using an automated bulk feed system such as vibratory feeder or conveyor, to load parts onto the platen. In manual mode, parts are placed on the transport by hand and the sorter does the rest.
For further flexibility, the software is used to create and edit inspection programs, as well as set operational parameters and calibrate equipment. A screen displays the part’s image with the overlaid measurements, and inspection programs are created directly over the interactive image.
Software tools are also provided to perform various types of measurements, which are typically applied to determine part diameters and lengths, chamfer measurements, corner radius, angle measurements, circles and arcs, and threads. The tools can be clicked and dragged anywhere over the outline of the part. Measurements are displayed on screen in a familiar drawing format.
After mastering simple programming procedures, it typically takes about 30 seconds to program a single measurement. So, if a part requires 10 measurements, it will take about 300 seconds, or 5 minutes, to create an inspection program.
“Once you learn the basics of the software tools, they are easy to apply to just about anything,” says Kaspari. “Typically, you pick a tool and drag it over a feature like length or diameter so it is pretty intuitive and easy to switch from one part to another.”
Warren Screw Products typically measures from 7 to 20 turned part features in this way, usually involving lengths, diameters, and thread pitch.
Although contract machine shops may be familiar with traditional part inspection methods, the flexibility, speed and accuracy of 100% inspection of precision turned parts can become a competitive advantage that enhances productivity and profitability.
For more info, call 201-384-6960; visit www.resecsystems.com; or write to Resec Systems LLC at 93-A South Railroad Ave, Bergenfield, NJ 07621.

