Today’s Machining World Archive: June 2006 Vol. 2, Issue 06
ELECTRONICS, COMPUTERS, VIDEO AND LASERS IN THE QC DEPARTMENT OFFER MORE OPTIONS FOR MEASURING MACHINED PARTS
Measuring completed parts can sometimes pose as much of a challenge as machining them. The many high-tech measurement instruments available today offer superb precision and accuracy, but measuring those parts can still be tricky. “Everyone wants the ‘Holy Grail’ of measurement,” says Mike Knicker, owner of Q-PLUS Labs, Irvine, CA, a full-service measurement and inspection laboratory. “They want one machine that does it all. It doesn’t exist.” So the challenge becomes choosing the appropriate instrument or instruments from the many that are on the market. The good news is that not only do these electronic devices measure your parts, they can also collect and record the data for you.
Conventional CMM (coordinate measurement machine)

Though it was invented decades ago, the familiar bridge-style coordinate measurement machine still has its place in the QC department, and the technology continues to evolve. This machine uses a touch probe to contact the measurement locations. Then, the machine does all the necessary calculations to obtain length, radius and other dimensions
Helmel Engineering, Niagara Falls, NY, offers a range of CMMs. The Checkmaster model fits on a benchtop, offers accuracy in the range of 0.0003 – 0.0004, and sells for under $14,000. For measuring critical, small parts like those used in medical or aerospace applications, the company’s new MicroGage offers an affordable option for those who need a high-precision automatic CMM. With accuracy of better than 0.0002, MicroGage pricing starts under $35,000.
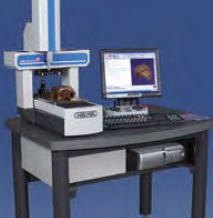
Art Whistler, vice president of sales and marketing, says Helmel CMMs have an affinity for the machine shop, as they are based on mechanical bearing designs and are “a bit more rugged and durable, suited for the manufacturing environment.” Also, Helmel CMMs do not require compressed air, so they are simpler to install than brands of CMM that require a source of compressed air to supply their air bearings, which are commonly used.
Arm-style CMM
A CMM with long, articulated arms can reach and bend to make measurements that are impossible with bridge-style units. “We developed it for the folks who don’t usually use CMMs,” says Darin Sahler, global public relations manager, FARO Technologies Inc., Lake Mary, FL, a well-known maker of arm-style CMMs.
These relatively compact, lightweight units, such as the FaroGage, can easily travel out on the shop floor or even be mounted on a machine as a dedicated measurement device. The FaroGage, which yields accuracy to 0.0004, costs about $14,000.
One happy FaroGage user is Dave Hall, vice president of Hallcraft Machining, Melbourne, FL. “We use it for repetitive measurements,” he says, “also for our first-article inspection and for reverse engineering.” Hallcraft makes a lot of motorcycle parts, Hall explains, and he might not have the drawings for mating parts, so “we use the Faro to give us the number from a model,” or from the mating parts, he says. Without access to the parts’ drawings, he can use the FaroGage to measure for the bolt holes and other features upon which to base the design of a new mating part. The CMM also comes in handy for measuring radius, taper and surface contour.
“We do some of our work in final QC” with the FaroGage, Hall says. “We’ll check the part, and we’re able to send a [printed] document that states what we found. A QC person is more likely to believe [that] than a handwritten report.”
Hall recommends installing a FaroGage on a granite base and setting up an x-y backstop to establish the reference measurement plane where the part contacts the backstop. This is much quicker than trying to touch three points to set your zero, he says. This approach can be helpful with any of the CMM or video systems.
Video measurement system
Touching a part with a probe isn’t always feasible, however. Flexible, small, intricate or delicate parts need special handling and special measuring. “To inspect a small, tiny part [you] probably would get some kind of non-contact CMM,” suggests David DeVowe, executive director of quality, Inspection
Division, QC Inspection Services, Inc., Burnsville, MN. A video system can measure most types of parts and is especially suited to some of the most challenging.
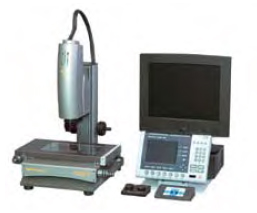
Mark Arenal, president of Kinemetric Engineering, LLC, Laguna Hills, CA, explains: “A video, or vision, measuring system uses a camera to deliver a magnified image to a video screen where the operator can target selected features with a crosshair reticle for a manual system, or for an automated system, a computer can process the measurements. Systems can range from very simple manually operated units to CNC-capable systems that can be programmed to measure automatically, using powerful image processing tools built into the measurement software. Automatic systems and semi-automatic systems help achieve rapid measurements with a high degree of repeatability while minimizing operator intervention.”
Kinemetric Engineering offers a range of non-contact measurement systems. A small, general-purpose video measurement system with 8” x 4” x-y travel, the KineMeasure KM200 costs around $16,000.
With automated video systems, DeVowe says, “you can program them and do repeat inspections. Once you have the program made, [the machine] finds the features itself, finds edges. [They] are especially good for profiles and overall dimensions in 2-D.” And it’s fairly easy to learn to use these video devices, he says.
Laser micrometer
For some parts, especially those with tight tolerances and fairly simple geometries, a laser micrometer might be the most suitable choice. In one
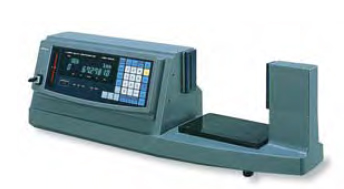
version, a laser beam shines on a spinning polygon-shaped mirror, which reflects the beam toward a lens that aligns the separated beam into parallel beams. On the opposite side of the measurement gap, a photoelectric cell receives the laser light. The photoelectric cell produces a voltage proportional to the amount of light that hits it. The item to be measured is carefully fixtured so it blocks some of the laser light from reaching the photoelectric cell. The laser micrometer calculates the dimension of the part in the measurement area, based on how much light it blocks from the receiver.
The Mitutoyo LSM-9506 bench-model laser scan micrometer measures parts from 0.02 to 2.36 in the dimension being measured, such as diameter. It is a self-contained unit, including laser and display, and costs around $6500. It achieve repeatability of +/– 30 microinches, and accuracy is also measured in microinches.
Profile measurement system
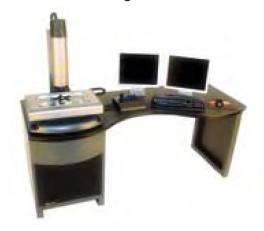
Some measurement machines are targeted directly at certain types of parts. For example, the TESA Scan and Profile systems from Brown & Sharpe, North Kingstown, RI, are designed specifically for round, cylindrical and turned parts, explains regional sales manager Ron Gardner.
In these machines, the part is held between centers or in a chuck, so it can turn. Parallel beams of light shine from one side of the measurement gap toward the other. When no part is in the way, all the light reaches a high-resolution CCD (light-sensing) array on the other side. When a part to be measured is in the way, it casts a distinct shadow on the CCD array, which registers, pixel by pixel, where it receives the light and where not. The system’s processor calculates dimensions based on the signals it receives from the array.
A profile unit can measure length, diameter, radius, grooves and many other features, as well as concentricity, straightness and runout while the part turns. Many of these profile machines also have the ability to measure different kinds and sizes of threads by tilting the part so the helix angle of the threads is parallel to the light beams and the system can get a good reading on the geometry of the threads.
The TESA Scan and Profile systems come in a range of sizes. The smallest, TESA Scan 25 measures parts up to 1″ (25 mm) in diameter and 8″ long. It sells for $33,700.
Using a profile measurement system, a TESA Scan 50+ big brother to the 25, has made a huge difference in inspection time at Mearthane Products Corporation in Cranston, RI. “It used to take us two hours to measure a 15-piece sample of parts. Now it takes 45 seconds for each piece.” says Ray Perry, quality engineering manager at the custom polyurethane molding house.
Many of Mearthane’s products, such as rollers for copiers, have shafts molded into the plastic. And many of the dimensions, both of the shafts and the finished parts, are critical. “Basically, we have shafts that have up to 20 different dimensions, including runout and concentricity, plus the location of the urethane [with respect to the shaft],” says Perry. “Before, we used laser
micrometers and height gages and an optical comparator. [With profile measurement,] once you program a part, you just run it.”
Hybrid techniques
Lots of people have both CMMs and vision systems and use them separately, says Knicker. Now, hybrid systems are available that integrate vision and touch probe technology.
Kinemetric Engineering manufactures video coordinate measurement devices that can also accept touch probes, so the two technologies work together. The company’s CP8K unit can also accept a laser scanning head, and, according to Arenal, some power users make all three modes work together, video, touch and laser. A basic CP8K (CNC-video) would start around $40,000; touch probe, laser head and other accessories are additional. For customers who already have a bridge-style CMM, Kinemetric offers the MultiProbe MP100, a zoom optical-video head that mounts on the CMM, for $8,000. You can also install a touch probe on the MP100, so this is an economical way to achieve contact/non-contact capability in one setup.
Laser scanning
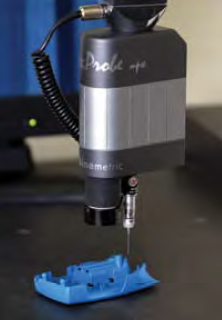
Laser scanning was originally developed for medical and dental uses, DeVowe says, which need to have surfaces reproduced very precisely. A laser scan measures the location of thousands of points on the surface of an object. This produces a “point cloud,” a file containing a great number of points located very close together, which describe the surface shape of the object scanned. The point cloud file can be used as a model for creating a CAD drawing. As the CAD drawing is developed, the engineer can compare the scan with the drawing. It would be nice if a CAD program could automatically create a drawing from the point cloud scan data, but so far, DeVowe says, this isn’t possible, but likely will be at some point.
DeVowe’s lab has laser-scanned some unusual things. One company that was designing prostheses to replace missing fingers found that their artificial fingers always looked, well, artificial, DeVowe says. So the company made a careful, very detailed cast of someone’s real finger and sent it to Inspection Services to be laser scanned, and the resulting “point cloud” was used as a model.
These measurement technologies can save time and prevent errors, once you select the right tools for the job and take advantage of their capabilities. Some of the technologies are amazing, but no machine can do the job by itself, at least not until it’s set up and programmed by a human being. Knicker appreciates the promise of the latest technologies but noted that the best measurement happens in a well-equipped lab with skilled people.
