Today’s Machining World Archive: December 2008, Vol. 4, Issue 12
When parts break, an analytical lab can do the detective work to find out why.
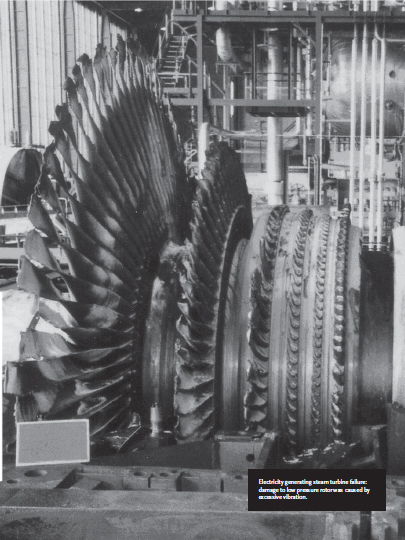
Sometimes machined parts present a mystery. Why did this one fail? How was that one made? It takes a certain amount of detective work combined with laboratory analysis and knowledge about materials, processes and applications to figure out what happened. Did the end user overload the part beyond its design specs? Was there a design fl aw? Was the right material used? Was something wrong with the manufacturing process? Many analytical laboratories and consultants specialize in failure analysis, reverse engineering and technical sleuthing to find out how the bad stuff happened.
Failure! Preserving the evidence
When a part fails in your shop, or at a customer’s, it is of utmost importance to “preserve the evidence,” said Drew Killius, senior materials scientist at Analytical Answers, Inc., Woburn, Mass. Keep the broken pieces separate and do not do anything to them except wrap them in ordinary household aluminum foil to protect them until you can send them to a laboratory. Do not place the pieces in an envelope or plastic bag, as fibers or plastic may stick to the fracture surface.
Whatever you do, do not attempt to reassemble the part, Killius cautioned. “There is a huge temptation to see if the broken [pieces] fit together,” he said, but “we’re looking for features the size of bacteria.” Just touching the fractured surfaces to each other can destroy those clues.
Write down what happened when the failure occurred. If you have other unbroken parts of the same kind send a few to the lab, along with the broken pieces. Find related paperwork, such as drawings and the mill certification for the raw stock, and include copies.
Finding out what happened
At the lab, “the fi rst thing we do when we receive a part is to look at everything,” said David Von Rohr, metallurgical laboratory manager at Stork MMA Testing Laboratories, Inc., Newtown, Pa. Besides the part itself and the drawings and samples you sent, any information and background about the part and the application might prove useful in analyzing why the part failed. What is the part used for, and how long had it been in service? Exactly what happened when the part broke?
The failure analysis laboratory will photograph the part, verify its chemistry, look at the fracture surface under a microscope and check for any defects originating in the raw stock or from machining operations. Is the part to print? Does the design include any features like sharp corners that could act as stress raisers?
Mechanical properties may be measured including hardness, and yield and tensile strength. Is the material in the correct state? Sometimes parts are shipped without being heat treated, or they are over-hardened. If the part is plated, is the plating correct?
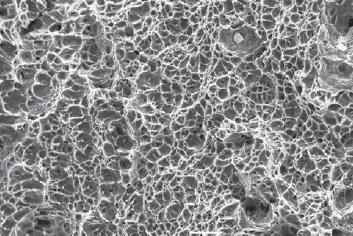
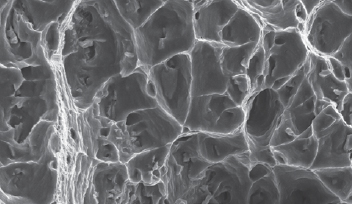
A scanning electron microscope (SEM) is often used to obtain highly magnified images of the fracture surface to help determine the failure mode. An SEM image of a polished cross-section can also reveal plating thickness, and other instruments can identify the plating material.
Then, the laboratory staff sets about analyzing what happened, based on the data and background information.
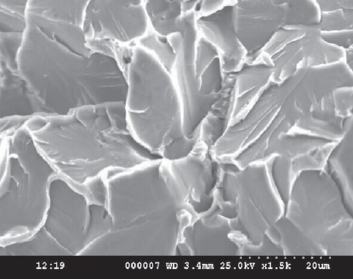
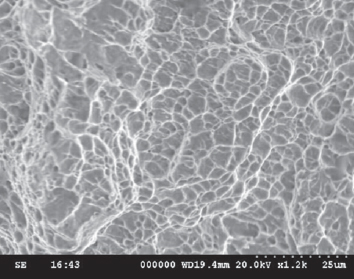
Parts can fail in many ways, including fracture and wear. The most familiar fractures happen by simple overloading of the part until it breaks. You may encounter other types of fracture, some of which are described below.
Fatigue: breaking bit by bit
Fatigue is probably the most common form of metal failure, said Salim Brahimi, consultant at IBECA Technologies Corp., Montreal, Québec, Canada. It is the result of cyclic loads on the material. Wherever there is vibration or other types of back-and-forth loading, fatigue may become a problem.
“The fatigue load is ever so slightly more than a piece can carry,” said Killius. “If it were any lower, the part could carry it. On each cycle the load deforms the part ever so slightly in a plastic (non-elastic) manner.” Fatigue failure can occur after thousands or millions of cycles. Examination of a failed part can reveal where a crack started and how it propagated through the material a tiny bit at a time. Typically, a series of lines on the fracture surfaces show how the crack deepened or widened progressively before failure.
Embrittlement: strong materials breaking at low loads
Though metal fractures are often called “brittle” or “ductile,” Killius said, “brittle” might better be described as when a material fails at a load much less than expected. A number of different mechanisms cause metals to fail in a brittle fashion. Hydrogen embrittlement is widely known as a problem with high-strength fasteners, but it can affect other applications as well.
For hydrogen embrittlement to occur, three factors need to be involved, explained Brahimi. First, the material must be susceptible to hydrogen embrittlement. High-strength materials are often susceptible, and the harder they are, the more susceptible they are. Second, hydrogen needs to be present. Processes such as acid pickling or electroplating can generate hydrogen, or hydrogen may be generated as corrosion occurs. Normally, susceptible parts are baked after plating or pickling to remove the hydrogen. Third, the part must be subjected to sufficient stress, whether internal residual stresses or external stress from an applied load.
Within the metal, Brahimi said, hydrogen is drawn to the location of highest stress. For a bolt, this is likely to be under the head or in the threads. The hydrogen finds its way through the metal matrix to where the stress is concentrated, at the tip of a crack or notch, and congregates there, interrupting atomic bonds. This reduces the strength of the material in this area.
Stress corrosion cracking
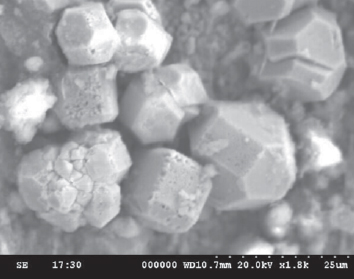
Stress corrosion cracking (SCC) occurs, said Killius, where there is a combination of a corrosive environment and stress. The stress can be either from an external load or from unrelieved residual stresses within the part. Even relatively mild corrosives can produce stress corrosion cracking. Many types of stainless steel are particularly affected by chlorides, such as the salt in sea water. Some copper alloys are susceptible to ammonia compounds.
This type of fracture is called “decohesive rupture,” Killius said, in which “the metal grains stop sticking to each other.” The corrosion goes along the grains, leaving the texture of the material similar to sand. The particles have a characteristic polyhedral shape (see photos).
Mysteries solved
Every laboratory analysis has its own story. Here are some examples.
- Stealth design error: Cam pins or cam screws are used in one type of locking assembly that fastens together panels of consumer-assembled furniture. In one application, Von Rohr said, cam screws about 3/8” in diameter and 2” long were machined from bar stock. A shop had been making these parts to the customer’s print, and they worked fine. At least they did until the customer specified a less expensive material. Cam screws made of the new material broke on installation. Stork MMA Testing Laboratories investigated. The part was made exactly to the print. However, the print mistakenly showed a sharp corner on one of the four edges, while the other three edges had radii. This sharp edge acted as a stress raiser. Parts made with the old material could withstand the installation stresses, but parts made with the new material could not.
- Bad surface finish in disguise: Killius related the story of small gold plated stainless steel electrical contacts that go into a million-dollar medical scanner. The scanner manufacturer bought 20,000 of the parts. At incoming, the inspector noticed that two pieces had spots on them, and decided to take a closer look at the whole lot and send them to Analytical Answers. The lab discovered the parts had a bad surface finish, which had been plated over.
- Bait & switch: A manufacturer of parts for surgical instruments had bid on a particular stainless steel part. He later discovered that a competitor was providing the part, apparently made offshore, at the cost of the specified material alone. Curious as to how this could be, the manufacturer asked Analytical Answers to determine what the material was. After examining the competitor’s part, the lab found it was not made from the specified stainless. It was chrome-plated carbon steel.
- Punching out: In a heavy industrial equipment application, steel disks the size of hockey pucks were designed to carry loads of up to 60,000 pounds, Killius said. Over time, to save cost, the material was changed from precipitation hardening stainless steel, to 400-series stainless with nickel plating, to carbon steel with heavy galvanizing. When users discovered that occasionally smaller loads, in the 12,000-pound range, would punch right through the disks, the manufacturer asked Analytical Answers to determine what was happening. The lab discovered that disks were not galvanized, but heavily electroplated. Normally, to prevent embrittlement, plated parts such as these should be baked after plating to remove hydrogen, Killius said, but these parts were not.
Failure prevention in the shop
“What you want to do when machining parts is to alleviate conditions that may cause premature failure,” said Brahimi. When machining parts, make sure radii are well controlled. Broken or incomplete radii can be stress raisers where a fatigue crack might start, so can notches or too-sharp, small-radius edges and corners. Alert your customer if you notice a potential problem with the design of the part.
Scratches, fins and internal burrs can all be stress raisers, Von Rohr said. Be careful to prevent tool chatter, too, as each chatter point is a stress raiser as well. And on threaded parts, if the thread pitch is off even slightly, this can lead to failure. “The incorrect thread will screw in OK, but the mating points will be in the wrong locations,” he said.
Your customers and their end users depend on you to produce good parts. You can help prevent problems by paying attention to potential design problems in the parts you make and maintaining constant vigilance over the machining process. But if there is a failure, the “detectives” in the failure analysis labs can figure out what happened.
